Understanding Field Guides: How to Read Bird Guides for Beginners
Feature photo: 4thebirds/Shutterstock
Read Time: 12 minutes

This post contains affiliate links. If you use these links to buy something, we may earn a commission at no additional cost to you. We only recommend products we fully support or use ourselves. Our full disclaimer
PIN THIS FOR LATER
Contents
So, you’ve decided to join the ranks of bird nerds, eh? Welcome to the club where “warbler neck” is a badge of honor and “little brown jobs” (LBJs) are a challenge we readily welcome!
If you’ve ever wondered how experienced birders seem to identify every chirp and feather with the ease of a seasoned twitcher, the secret starts with mastering the field guide.
Here, we’ll help you navigate the world of bird field guides so you can quickly identify birds and boost your birdwatching status from “obvious dude” to “seasoned twitcher” in no time.
Choosing the right field guide
First things first, let’s talk about the different types of field guides out there. You’ve got your traditional books, digital guides, and mobile apps. Each has its own set of perks and pitfalls, so let’s break it down:
Books: Ah, the classic. Nothing beats the tactile feel of flipping through pages filled with illustrations and detailed descriptions. Book-based guides are packed with info but can be bulky. If you’re the type who likes to disconnect and enjoy nature, a physical guide might be your best bet.
Digital Guides: These are perfect for those who want their birding info a click away. Digital guides offer searchable databases and hyperlinked content, making it easy to find the bird species you’re looking for. They’re usually accessible on devices like tablets, smartphones, laptops and e-readers.
Mobile Apps: The future is here, and it’s in your pocket. Mobile apps offer interactive features like audio bird calls, GPS functionality, and real-time sighting logs. Some even use photo recognition to help identify species on the fly.
They’re super convenient but can sometimes suffer from slow interfaces or limited illustrations for certain species.
The Merlin Bird ID app is an excellent tool for bird identification, especially for beginners and intermediate birders. The Merlin Bird app asks simple questions and provides accurate photos and descriptions to help identify likely bird species.

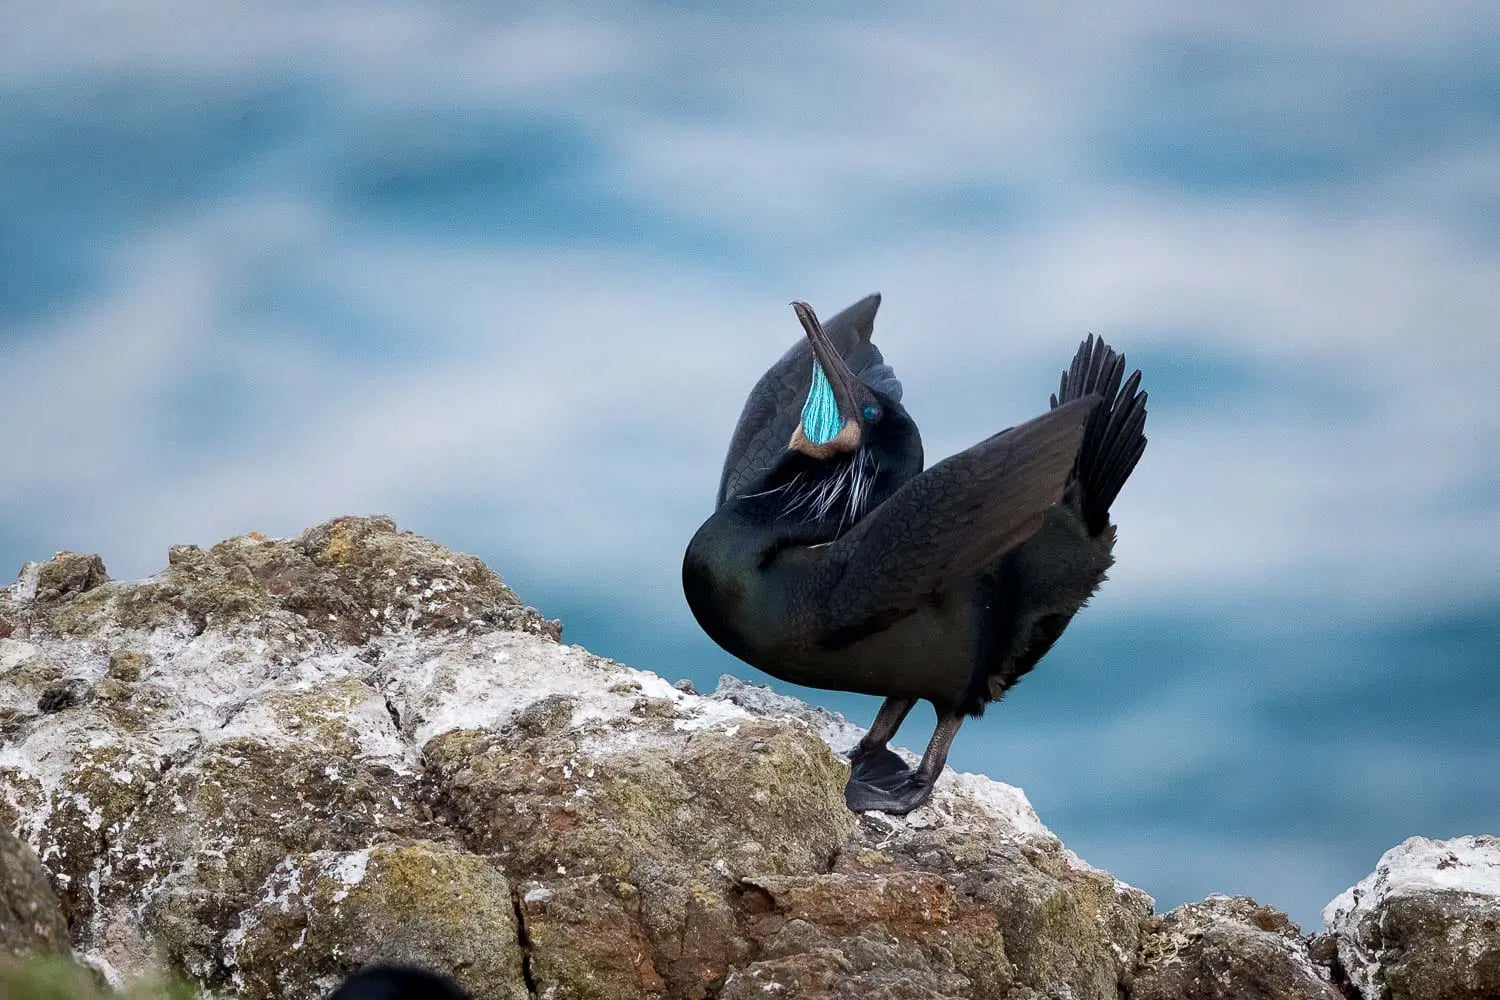
Figuring out what bird you’re looking at isn’t easy when you’re first getting started. But field guides are the key to get you from “little brown job” to “male white-crowned sparrow”. Photo: Jaymi Heimbuch
Field guide factors to consider
- Region: Make sure the guide covers your local area. A guide focused on North American birds won’t be much help if you’re birding in Europe. It’s important to choose a guide that includes all the birds likely to be found in your specific area or region.
- Level of Detail: Beginners might prefer simpler guides, while experienced birders may want comprehensive resources.
- Illustrations vs. Photos: We’ll dive deeper into this later, but know that some guides use detailed illustrations while others use real photographs.
Popular Field Guides for Beginning Birders
Here are some recommendations to get you started:
- The Sibley Guide to Birds: A comprehensive guide suitable for birders at all levels.
- National Audubon Society Birds of North America: Another excellent choice with a wealth of information.
- The Stokes Field Guide to the Birds of North America: Perfect for tbeginning birders, with simple layouts and concise descriptions for easy bird identification.
 |
 |
 |
 |
 |
|
|
|
|
|
|
Understanding the Layout of a Field Guide
Bird field guides are organized to make your birdwatching experience as seamless as possible, grouping birds by type so you can easily flip to the right section.
For example, you’ll find sections dedicated to raptors, shorebirds, and warblers, and so on.
By clustering similar species together, field guides allow you to quickly narrow down possibilities based on the bird’s size, shape, and habitat, making the identification process more intuitive and less overwhelming.
Index
The index is your quick reference tool. It’s especially handy when you need to find a specific bird or section fast. It will probably become the most used section in your guide, even if you haven’t been much of an index-flipping type before.
Species Accounts
Each species account is like a mini dossier on a bird. Here’s what you typically find:
- Common and Scientific Names: Every bird needs a fancy Latin name. And that’s not just to impress your friends. Common names are often different in various regions, or some bird species share a common name. So it gets confusing fast! The Latin name ensures precision in your identification and sharing that information with others.
- Description: Key features and field marks.
- Range: Where you’re likely to find the bird.
- Habitat: Preferred environments. This is helpful for weeding out possible species that you aren’t likely to find in a certain type of habitat.
- Behavior: Notable behaviors and traits.
- Illustrations or Photos: Visual aids to help with identification.

Using a field guide starts with the big picture – size, shape, and habitat. From there, the details get you from type of bird (a small duck-like thing swimming in fresh water) to specific species (a female hooded merganser). Photo: Jaymi Heimbuch
Identifying birds using field guides
Identifying birds can feel like solving a mystery. Here’s how to use your field guide to crack the case (and most field guides have a walk-through of this as part of the intro):
Gather the right information
There are many species that look or act similar, so to ensure you get a solid match, here’s what to pay attention to:
Key Features
- Size and Shape: Compare the bird’s size to common birds you already know.
- Color and Markings: Note the color of the feathers, beak, legs, and any distinctive markings.
- Behavior: Observe what the bird is doing—perching, feeding, flying?
- Habitat: Consider where you are. Is it a forest, a wetland, or your backyard?
Behavioral Descriptions
- Foraging: How and where the bird looks for food.
- Perching: How the bird sits on branches or other structures.
- Flight Patterns: The way a bird flies—straight, fluttering, soaring.
Field Marks
Field marks are the unique identifiers of birds. Pay close attention to them. Some examples of field marks are:
- Beak Shape: Different shapes for different diets.
- Wing Bars: Stripes on the wings that can be a giveaway.
- Eye Rings: Circles around the eyes, often distinctive.
- Tail Shape: The way the tail feathers are arranged and their length.
We give 20% of all shop profits to bird conservation & inclusive birding efforts.
Get to the right page
So, you’ve just spotted a bird and jotted down its key features. Now, it’s time to crack open your field guide and nail that ID. Here’s how to do it:
-
Review Your Notes:
- Quickly glance over the characteristics you noted: size, shape, color, markings, behavior, and habitat.
-
Flip to the Quick Reference Section:
- Most field guides have a quick reference section grouped by bird type, color, or habitat. Start here to narrow down your options.
-
Find the Right Section:
- Based on your observations, flip to the relevant section. For example, if you noted a small, brown bird, head to the section on “little brown jobs” (LBJs). J/K. If your bird is sparrow-like, try the sparrow sections first. Is it colorful, small and super-flitty in a tree canopy? Try the warbler section first.
-
Compare Size and Shape:
- Once you’ve flipped to the likely section, start scanning the possibilities for a match. Look at the illustrations or photos in the section. Match the size and shape of your bird with the birds in the guide. Is it a small, round bird or a long, slender one?
-
Match the Color and Markings:
- Focus on the bird’s color and any distinctive markings you noted, such as wing bars, eye rings, or streaks. Narrow down to birds with similar patterns.
-
Check Behavior Notes:
- Read the descriptions for behavior. Does the bird’s behavior in the guide match what you observed? This can help confirm your ID.
-
Use Range Maps for Confirmation:
- Look at the range maps provided. Ensure the bird you think it is can actually be found in your area and during the current season.
-
Cross-Reference Similar Species:
- If you find a close match, check the guide for similar species that might look almost identical. Read through their descriptions to spot subtle differences.
-
Verify with Multiple Views:
- Some birds are shown from different angles or in different plumages (male, female, immature). Make sure to compare all views to ensure a positive ID.
-
Consult Additional Guides if Needed:
- If you’re still unsure, don’t hesitate to check another field guide or a birding app. Cross-referencing can help clear up any lingering doubts.
-
Make Your Final ID:
- Once you’ve gone through these steps, make your final identification. Note it down, and maybe even give yourself a pat on the back—you’re becoming a birding pro!
By following these steps, you’ll methodically work through the field guide and increase your chances of accurately identifying that mystery bird.
We give 20% of all shop profits to bird conservation & inclusive birding efforts.

Sometimes you only get a glance at the bird, without much detail. And sometimes that’s enough – like with this very distinct New Zealand fantail. But, sometimes you need to make extra sure you’re IDing the right species. That’s where things like seasonal movements and range maps come in handy. Photo: Jaymi Heimbuch
Confirm your ID with these extra bits of info
Seasonal Variations
Birds are not static creatures; they change their plumage, behavior, and location with the seasons. Notice in your field guide if there are differences in summer vs winter plumage for individual species, and use that as extra help for what to look for based on the season you’re birding in.
Illustrations vs. Photos
Illustrations: Often more useful than photographs because they highlight crucial field marks consistently. An artist can emphasize the particular features you need to see for identifying birds.
Photos: Provide a realistic depiction but can vary due to lighting, angle, and bird posture. They’re great for seeing what a bird looks like in real life but might not always highlight key ID features.
Utilizing Range Maps
Range maps are your best friend when it comes to figuring out if that “very rare bird” is really out of place or just taking a detour. Range maps will highlight where species are expected to be, and when.
- Year-Round Range: Where the bird lives all year.
- Breeding Range: Where the bird goes to breed.
- Winter Range: Where the bird heads for winter.
- Migration Range: The path the bird takes during migration.
Using Range Maps Effectively
- Match Maps to Location: Make sure the bird you’re looking at is actually supposed to be where you are. That doesn’t mean you aren’t looking at a certain species that “shouldn’t” be there, since there are always vagrants. But, it certainly helps to narrow down likely candidates.
- Seasonal Considerations: A bird’s range can change with the seasons. Check the time of year.
- Local Guides: Guides tailored to your area will have more accurate range maps.

Never give up the joy of actually watching birds just to identify the species right then. You’ll miss out on super cool behaviors – like watching an American dipper swim around for food. Take good notes, enjoy the moment, and look it up later. Photo: Jaymi Heimbuch
Tips for using your field guide in real-time
Using a field guide effectively can make or break your birding experience. Panicking to ID a bird before it flies away and frantically flipping through pages doesn’t make for the most ideal outing. Here’s how to enjoy IDing while you’re in the field.
-
Observe First, Reference Later
Before reaching for your field guide, take a moment to observe the bird. Notice key details: size, color, markings, behavior, and habitat. Jot these down quickly if you can. The more you observe, the easier it will be to identify the bird later. Just watch for awhile – because the more you watch, the more meaningful (and potentially critical) ID markers you’ll notice.
-
Use Quick Reference Sections
Once you’ve enjoyed the watching part, and while the vision of the bird is sharp in your memory, flip open your guide. Many field guides have quick reference sections at the front or back. These sections group birds by color, shape, or habitat. If you’ve noted the bird’s primary color or distinctive features, flip to these sections first to narrow down your options.
-
Match Key Features
Start matching the bird’s observed features with the descriptions and illustrations in the field guide. Look for key identifiers like:
We give 20% of all shop profits to bird conservation & inclusive birding efforts.

The details matter. This red crossbill could be mistaken for a house finch or purple finch. But if you notice size, plumage patterns, and of course that amazing bill shape, it’s a cinch to pin down its true identity. Photo: Jaymi Heimbuch
Practical tips for speedy and efficient field guide use
-
Bookmark Key Sections
Use sticky notes or bookmarks to mark sections of your guide that you frequently reference. This saves time when you need to quickly flip to a section.
-
Understand the Layout
Familiarize yourself with the layout of your guide before heading out. Know where to find range maps, field marks, and descriptions quickly. This knowledge can save precious time in the field.
-
Compare Multiple Views
Many field guides include multiple illustrations or photos of the same species (male, female, juvenile, in flight, perched). Compare all views to make sure you’re not mistaking a juvenile or female bird for a different species.
-
Use Range Maps for Confirmation
After matching physical features, use the range maps to confirm that the bird could realistically be where you’re seeing it. Check if the bird is within its expected range for the current season.
-
Focus on Field Marks
Field marks are the distinctive features that help differentiate species. Pay special attention to these when matching a bird in your guide. Look for markings on the wings, head, and tail, as well as overall coloration.
-
Cross-Reference Similar Species
If you find a bird that matches closely but not perfectly, check similar species in the guide. Many guides group similar species together and highlight the subtle differences.
-
Stay Organized with Notes
Take detailed notes on your observations, including time, weather, location, and specific features of the bird. Cross-reference these notes with the guide to ensure accuracy. Many birders keep physical records and write down lifers in their guides – so despite what your elementary school librarian told you, don’t be afraid to scribble in the margins.
-
Be Patient and Methodical
It’s easy to get excited when you spot a bird, but taking your time will lead to more accurate identifications. Work through the guide methodically, checking off each identifying feature.
We give 20% of all shop profits to bird conservation & inclusive birding efforts.

Learning to use field guides will help you quickly pick out who is who – even in a mixed flock of migrating geese, like these snow geese and greater white-fronted geese. Photo: Jaymi Heimbuch
Advanced ID techniques for experienced birders
-
Memorize Common Species
Familiarize yourself with common birds in your area to quickly rule them out. This allows you to focus on identifying more unusual species without getting bogged down.
-
Use Multiple Guides
No single guide is perfect. Bring along a secondary guide or use a digital app to cross-reference and confirm identifications. This can be especially helpful for tricky IDs or rare birds.
-
Learn Bird Calls
Many birds are more easily identified by their calls than by sight. Use apps or audio guides to learn common bird calls and match them with the species in your field guide.
-
Sketch Your Observations
If you’re artistically inclined, sketch the bird you’re observing. This can help cement features in your memory and provide a visual reference that you can compare with your guide later.
-
Get a reference photo
If you can get a quick image of the bird, that’s helpful for referencing specific field marks later. Don’t worry, you’re not trying to get into the pages of National Geographic. Even a somewhat blurry photo can be helpful as a reference when you check your field guide.
-
Engage with Other Birders
Share your findings and discuss identifications with other birders. They might have insights or experience with particular birds that you lack.
-
Combining Multiple Field Guides
Mixing and matching multiple field guides is wise; each guide brings its own unique flair to the table, making your IDs faster and more accurate. No guide is perfect, so combining them gives you the best of what’s out there for identification.

Avoid having “womp woooomp” moments while using field guides. Double-check your IDs, pay attention to details, and – as with everything – have patience. (North Island Robin) Photo: Jaymi Heimbuch
Common mistakes and how to avoid them
Everyone makes mistakes, but here’s how to avoid the most common ones in birdwatching:
Misidentification
Double-Check Your ID: It’s easy to get excited and jump to conclusions when you spot a bird. Before you shout “rare bird!” to the heavens, double-check your identification. Look at the bird, then look at your guide, and make sure the key features match up. Pay attention to size, color, and markings. This’ll help ensure you aren’t getting your bird species confused with other birds.
Consult Other Birders: Birders are a friendly bunch, and there’s no shame in asking for a second opinion. Whether you’re out in the field or sharing a photo online, experienced birders can offer valuable insights and might notice details you missed.
Use Multiple Guides: No single guide is perfect. Each one has its strengths and weaknesses, and using multiple guides can provide a more comprehensive view. Cross-reference between books, apps, and websites to confirm your identification.
Overlooking Common Species
Practice Makes Perfect: Before you chase after those extremely good ticks, get to know your local, common species. Familiarity with common birds helps sharpen your identification skills and builds a solid foundation. When you can identify the everyday visitors to your backyard, it becomes easier to spot something unusual.
Don’t Dismiss the Ordinary: Common birds can be fascinating too. Studying their behavior and variations can teach you a lot about bird identification and ecology. Plus, every birder needs to know their sparrows from their finches, even if they’re not the most glamorous species.
Getting Discouraged
Stay Patient: Birding is a marathon, not a sprint. It takes time and practice to become proficient. Remember, even the most experienced birders were once beginners who struggled to identify species. Patience is key, and every outing is an opportunity to learn.
Enjoy the Process: Focus on the joy of being in nature and observing wildlife. Birding isn’t just about ticking off rare birds found on a list; it’s about the experience. The more you enjoy the process, the more motivated you’ll be to keep learning and improving.

After a little while, you’ll notice that you lean on your field guide less and less while birding locally. Soon, that Townsend’s warbler on the tree in your yard is as distinct and instantly obvious to you as any family member. Photo: Jaymi Heimbuch
Final tips for success
🐦 Learn Bird Songs: Sometimes you’ll hear a bird before you see it. Learning to recognize bird calls can help you identify species without needing a visual confirmation. There are apps and online resources that make learning bird songs fun and interactive.
🐦 Stay Organized: Keep a birding journal or use an app to document your sightings. Note the date, location, weather, and behavior of the birds you observe. Over time, these records can help you spot patterns and improve your identification skills.
🐦 Get the Right Gear: While this isn’t about planning or packing, having the right gear in the field, like a reliable pair of binoculars and a portable field guide, can make a huge difference. Quality binoculars will help you see those crucial details more clearly.
🐦 Visit Local Hot Birding Sites: Some locations are birding goldmines. Getting acquainted with the local hotspots can increase your chances of seeing a variety of species and rare birds. Plus, you’ll often run into other birders who can share tips and sightings.
🐦 Join Birding Groups: Whether in person or online, birding groups can be incredibly supportive. They offer a wealth of knowledge, camaraderie, and often organize group outings that can enhance your skills and enjoyment.
Field guides are your gateway to the wild and wonderful world of birdwatching. They’re packed with so much of the info you need to identify, understand, and appreciate the birds around you.
But of course they don’t replace real life observation.
So grab a notepad, your ‘nocs, and head outside to practice your skills!